The No-Code modules store values and react to them entirely in the editor, with assets, components and UnityEvents. Everything here is also reachable from code, in For developers.

Persistent Variables

PersistentVariables is a ready-made asset holding a named set of values, authored in the inspector. It is a persistent object like any other: it gets a Persistence Manager dropdown and saves the same way.

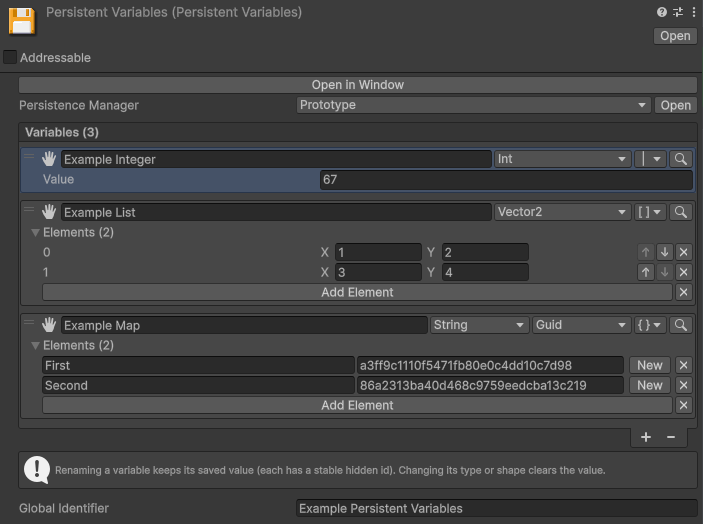
Create one via Create > Persistent Asset > Persistent Variables, assign a Persistence Manager, then add variables. Each has a name, a type and a default value. Over 40 types are supported:

  • Primitives: bool, string, char, and every number type (int, long, float, double, byte, sbyte, short, ushort, uint, ulong, decimal).
  • Any enum (no setup needed).
  • Unity types: Vector2/3/4 and Vector2Int/3Int, Quaternion, Color, Color32, Gradient, Rect, RectInt, RectOffset, Bounds, BoundsInt, Pose, Plane, Matrix4x4, LayerMask, RenderingLayerMask, RangeInt, Resolution, Hash128, Keyframe, AnimationCurve.
  • System types: DateTime, DateTimeOffset, TimeSpan, Guid, Version, Uri.
  • Any project asset (no setup needed): pick Asset in the type menu, then the kind of asset it holds, and the variable takes an object field like any inspector reference. See asset variables below.
  • Lists and maps of any of the above.
Persistent Variables inspector
Author variables, names and defaults in the inspector
Renaming a variable is safe at any time, even after release: components stay wired to it and existing saves still load into it.
For programmers, a PersistentVariables asset is a dynamic data bag: a named, typed, observable set of values that saves itself, with no data class to write. Reach it from code through a VariableRef (see For developers).

Variables holding an asset

A variable can hold a project asset: the selected character, the equipped weapon, the chosen music theme. Pick Asset in the type menu, choose which kind of asset it accepts, and drag one into the field. It is saved like any other value.

Assets your game picks at runtime, rather than in the inspector, need one extra step: see saving asset references.

The components

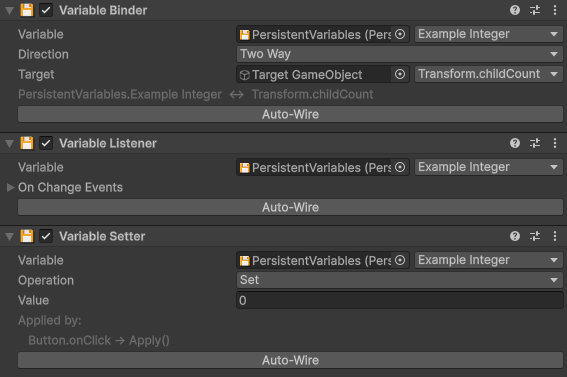
Three components connect a variable to your scene, each configured in the inspector:

  • Variable Binder: keeps a variable and a target in sync, one-way or both ways, so a change on one side updates the other (a UI slider and a "volume" variable, for example).
  • Variable Listener: raises a UnityEvent whenever the variable changes.
  • Variable Setter: changes a variable from a UnityEvent (a button click). It can Set, Toggle, Increment, Add or Reset the value.
Variable components in the inspector
Bind, listen and set, all from the inspector

A typical setup: a Setter on a button increments a "coins" variable, a Listener updates a label when it changes, and it all persists because the PersistentVariables asset has a manager.

A Binder driving a text label takes a Format string to turn the value into readable text: a composite like "Score: {0}" or a numeric specifier like "N0". Formatting a value into text is one-way (variable to label).

Connecting variables (drag and drop)

There are two ways to point a component at a variable. To drag a variable, grab it by its hand, the drag handle at the left of its row in the Persistent Variables inspector.

Onto a component field

Every component has a variable field. Fill it by dragging a variable from the Persistent Variables asset onto the field, or by assigning the asset and picking the variable from the dropdown next to it.

Assigning a variable to a field
Drag a variable in, or choose it from the dropdown

Onto a GameObject

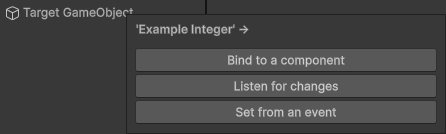
Drag a variable straight onto a GameObject, in the Hierarchy or the Scene. A menu asks what to create (a Binder, a Listener or a Setter), prompts for whatever that component needs (a binder's target property, for instance), and adds it already wired.

Dragging a variable onto a GameObject
Drop a variable on a GameObject and pick what to create

Saving and loading from the inspector

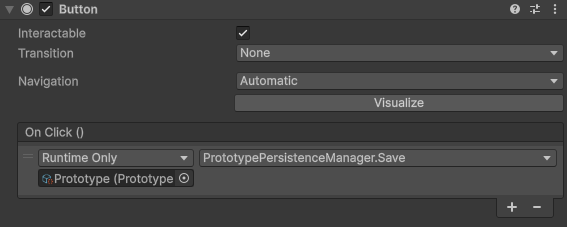
Persistence is automatic, so there is usually nothing to wire. For an explicit save, load or clear from a button, the manager exposes Save, Load and Clear actions, picked straight from a button's event list. These zero-argument actions are fire-and-forget, so they also work with an asynchronous manager (a server or Cloud Save).

Anything slot-related still needs a small script today: switching the active slot, building a save-select menu (a slot registry), and the Slots copy / rename / delete operations are all code-only.
Wiring Save to a button OnClick
Drop Save / Load / Clear straight onto a UnityEvent

Input bindings

The Input module makes a player's remapped controls persist between sessions. It adds an Input Binding variable type, so a control binding can be stored like any other persistent value and is restored on the next launch.

Requires the Unity Input System package in your project.

A "press a key to rebind" screen needs a few lines of glue: capturing the new binding, and applying the saved one on startup. That API is in For developers.

Localization

The Localization module persists the player's chosen language. It adds a Locale Identifier variable type, so the selected locale is stored like any other value and reapplied on the next launch.

Requires the Unity Localization package in your project.

Applying the saved locale on startup and switching it from a language dropdown use a small helper, covered in For developers.

For developers

Everything above is reachable from code, to mix scripting with the no-code setup.

Reading and writing variables

Reference a variable with a non-generic VariableRef field when the type is not known ahead of time, or a typed VariableValueRef<T>, VariableListRef<T> or VariableMapRef<TKey, TValue> when it is. Either is assigned in the inspector the same way as a component (drag or dropdown), and its live value is read and written in code. Collection variables surface as ObservableList<T> and ObservableDictionary<TKey, TValue>, which raise change events.

public class Shop : MonoBehaviour
{
    [SerializeField] VariableValueRef<int> coins;            // assigned in the inspector
    [SerializeField] VariableListRef<string> unlockedSkins;
    [SerializeField] VariableMapRef<string, int> owned;      // a map variable

    public void Buy(int price)
    {
        if (coins.Value >= price)
            coins.Value -= price;                       // read and write the live value

        unlockedSkins.List.Add("gold");                  // ObservableList<T>, raises change events
        owned.Map["gold"] = 1;                          // ObservableDictionary<TKey, TValue>, also observable
    }
}

Type conversion on binders

A VariableBinder can route through a ValueConverter to adapt the variable's type to the bound member's type (an int variable driving a string label, for example). Built-in converters cover the common cases. Add your own by subclassing ValueConverter<TFrom, TTo>, which is discovered automatically; a two-way binding needs one converter each way:

public class IntToString : ValueConverter<int, string>
{
    protected override string Convert(int value) => value.ToString();
}

Input & localization helpers

The Input and Localization modules each expose a static helper for the bits that need code:

  • InputBindingPersistence: apply a stored binding on startup, capture the current one, or rebind and store in a single call for a remap screen.
  • LocalePersistence: apply the saved locale on startup, capture the active one, or select a locale and store it for a language dropdown.
// Both are extension methods on your PersistentVariables asset
variables.ApplyBinding("Jump", jumpAction);                  // restore on startup
variables.RebindAndStore("Jump", jumpAction);                // run a remap screen, then store

variables.ApplyLocale("Language");                          // restore on startup
variables.SelectLocale("Language", new("fr"));               // pick one from a dropdown
Two constraints on these helpers. ApplyLocale and SelectLocale only work once Unity Localization has finished initializing (await LocalizationSettings.InitializationOperation); before that they do nothing and return false. RebindAndStore returns a RebindingOperation: cancel it in OnDisable / OnDestroy so its completion callback never runs on a destroyed object.

Custom types and converters

Your own persistable variable types (a VariableTypeCodec<T> with [VariableType(typeof(T), "id")]), type conversions (a ValueConverter) and inspector widgets plug in the same way Input Binding and Locale Identifier do. See Extending.

// Make a custom type persistable: write it to a string and read it back
[VariableType(typeof(Guid), "guid")]
public class GuidCodec : VariableTypeCodec<Guid>
{
    protected override string Write(Guid value) => value.ToString();
    protected override Guid Read(string text) => Guid.Parse(text);
}